Preparing To Plant
Step 1: Check Above Ground.
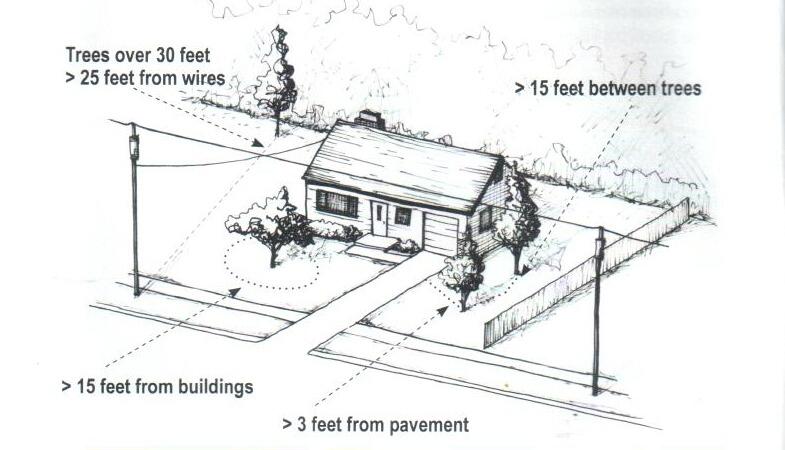
Do not plant you tree where it will interfere with buildings, overhead utility lines, pavement, or intersection sightlines as it gets bigger.
Make sure your planting spot is at least…
- 3 feet from pavement or fencing on all sides
- 15 feet from buildings or other trees
- 25 feet from overhead electric wires, if your tree will grow taller than 30 feet.
If your tree will grow taller than 30 feet, do not plant it within 25 feet of overhead electric wires.
Step 2: Check Below Ground.
At least 72 hours in advance of planting, call the underground utility locating service in your area to be sure that there are no buried utilities where you want to plant.
Step 3: Check Laws.
Check with your town or municipality to be sure that you are complying with their regulations and landscape ordinances.
Installation/Planting
Step 1: Move The Tree.
Do not lift or carry your tree by its trunk (unless it’s a bare root).
Step 2: Remove Trunk & Branch Packaging.
Remove trunk wrap, twine around the branches, and labels. Leave any root packaging in place for now.
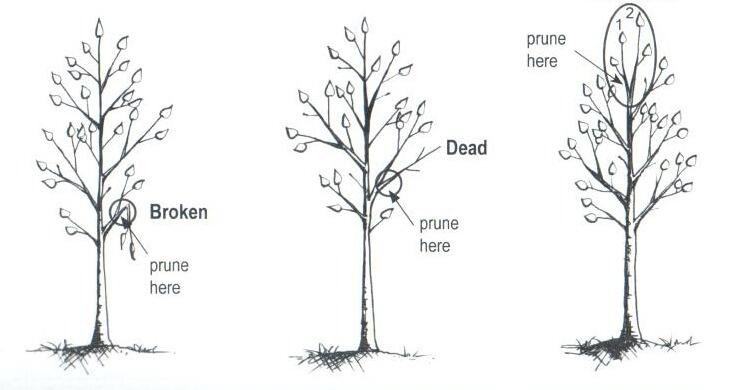
Step 3: Prune Critical Branches and No Others!
Prune only branches that are broken or dead. You may also remove competing leaders, if present. Most trees should have one central leader. If there are two or more leaders, choose which one you want to remain and remove the others.
Step 4: Find The Main Root System, and Remove Excess Soil.
Remove soil from the top of the root ball until the main root system is exposed. There should be several roots at least as big around as a pencil extending in opposite directions from the trunk. You may have to remove 2″ of soil before finding the main roots.
• Balled & burlapped trees: Remove the top of the root ball packaging. Cut any twine from around the trunk taking care not to nick the bark. Then bend the wire basket back off the top of the ball. Remove soil from the top of the root ball until the main root system is found. You may have to cut some of the wire. Leave the rest of the wire basket in place until the tree is put in the ground.
• Containerized trees: Remove the entire container. Pull or cut off the top of the root ball until the main root system is found.
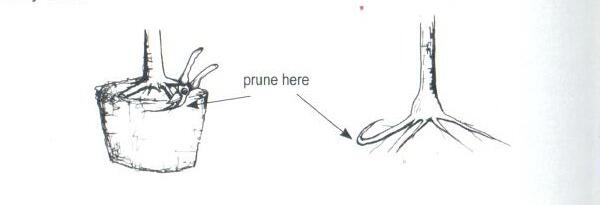
Step 5: Remove Problem Roots.
A. Remove all small roots above the main root system with a hand pruner.
B. Examine the main root system for roots that extend out but then turn to the side or back towards the trunk. Prune these roots at the point where they turn.
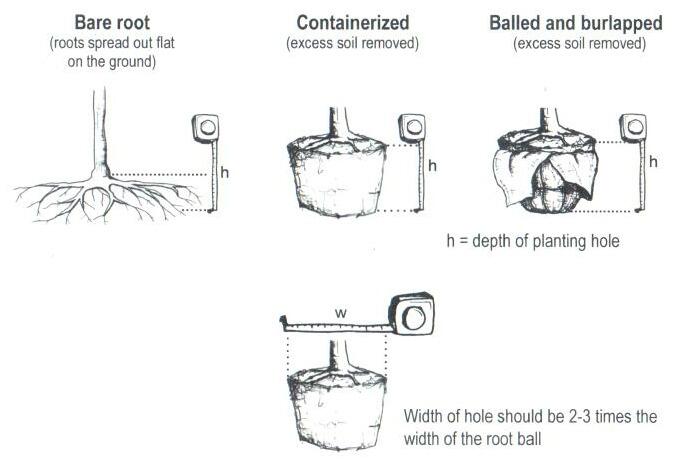
Step 6: Determine How Deep and Wide To Dig.
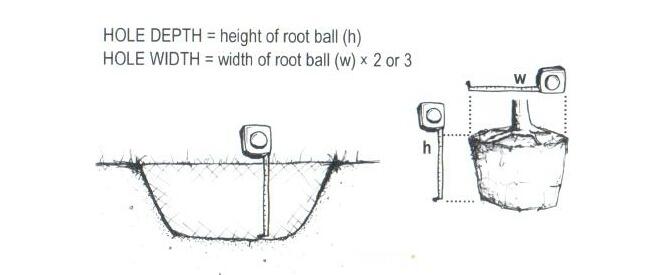
A. Measure the height of the remaining root ball. This is exactly how deep you should dig the hole.
B. Measure the appropriate width of the root ball system. Multiply this by 2, or if your soil is hard (clay or compacted), by at least 3. This is how wide you should dig the hole.
Step 7: Dig a Hole.
• Do not put a $100 tree in a $10 hole. The dimensions of the hole are very important in determining the survival of your tree. Dig the hole ONLY as deep as the root system (NO DEEPER!).
Step 8: Put The Tree In The Hole.
If the tree has a heavy root ball, slide it into the hole, and straighten the trunk.
Step 9: For Balled and Burlapped Trees, Remove Root Ball Packaging.
Balled-and-burlapped trees: Without loosening the root ball, cut, peel back, and remove as much of the wire basket and burlap as possible (at least the top third).
Step 10: Backfill With The Same Soil.
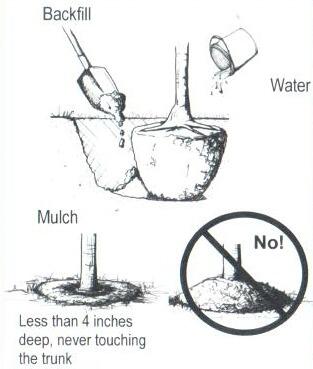
Make sure the trunk is straight. Put the original soil back in the hole, breaking up large clods, and working it in with your hands or a shovel.
Step 11: Water.
Water the root ball and entire backfilled area.
Step 12: Mulch.
Put a 2″-4″ layer of mulch over the backfilled area. Put mulch away from the trunk so that none touches the bark.
• Mulch becomes soil.
There should never be more than 4 inches of mulch over the roots. Too much can prevent the roots from getting necessary oxygen.
Watering
How Often and How Much?
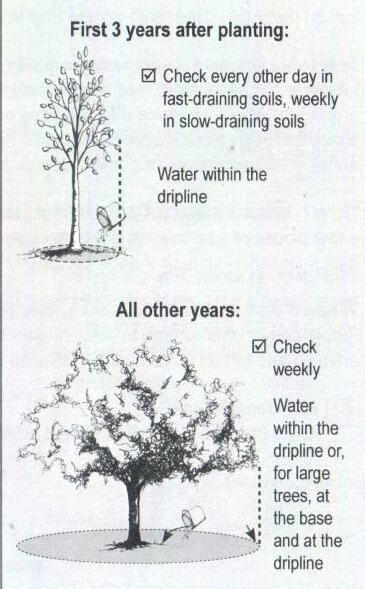
Frequency depends on soil drainage. Soils that drain quickly will require more frequent watering than those that drain slowly. The best way to know how often to water is to check the soil moisture at 6″ below the surface.
First 3 years after planting: If the soil is dry, provide about 1-1/2 gallons of water per diameter inch of the trunk.
All other years: Because soil type and weather conditions influence the demand for water, irrigation schedules and amounts vary.
• Tree Roots Need Oxygen.
Soil saturated with water for more than 24 hours can prevent roots from getting oxygen, Therefore, watering too much is as dangerous as watering too little (and hard to correct).
Where?
Water the area within the dripline. For larger trees, focus watering on the area within 6′ of the trunk and the dripline.
When?
Start checking soil moisture and watering when necessary in early spring, and continue until the soil freezes.
Installing a Trunk Guard
Trunk Protection
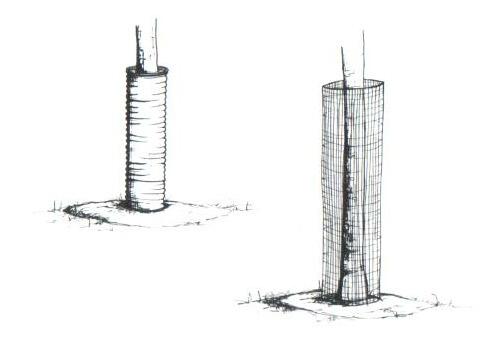
Young deciduous trees have thin bark that can easily be damaged by animals and equipment (most commonly string trimmers and lawn mowers). Mulch does a great job of keeping grass away from trunks, but rodents such as rabbits and mice like chew on young bark. Deer also scrape tree trunks with their antlers.
To prevent long-term damage associated with trunk wounding, install plastic tubing or hardware cloth around the trunk. The tube should be big enough around to allow 1-4″ of space between it and the trunk. It should be 1-3′ tall for small rodents and as tall as possible for deer.
